みなさんこんにちは。今回は、プログラミング言語「Processing」について話していこうと思います。


Processingってなに?
Processingは、ビジュアルアートやインタラクティブなコンテンツを作るためのオープンソースのプログラミング言語であり、開発環境(IDE)です。
主にアーティスト、デザイナー、初心者プログラマー向けに設計されており、簡単なコードでグラフィック、アニメーション、データ可視化、インタラクティブなアプリケーションを作成できます。
コードはJavaをベースに作られた言語ですが、シンプルな作りに書き換えられているので初心者にも安心です。
結果ライブラリも充実しています。
ubuntuでのインストール方法
sudo snap install processing上記のコマンドでインストールできます。
windowsの場合は、https://processing.org/download からダウンロードできます。
ubuntuでの起動には、
processingでシンプルに起動できます。
書き方
Processingのコードは主にsetup()とdraw()を基盤に動きます。
1. 基本構造:setup()とdraw()
Processingプログラムは通常、2つの主要な関数で構成されます。
- setup():プログラム開始時に1回だけ実行。ウィンドウサイズや初期設定を行う。
- draw():繰り返し実行(デフォルトで1秒に60回)。アニメーションや動的描画を担当。
例:ウィンドウを作り、背景を白に設定して円を描く
processing
void setup() {
  size(400, 400); // 400x400ピクセルのウィンドウを作成
  background(255); // 背景を白に(255は白、0は黒)
}

void draw() {
  ellipse(200, 200, 50, 50); // 中心(200,200)に直径50の円を描く
}- 結果:
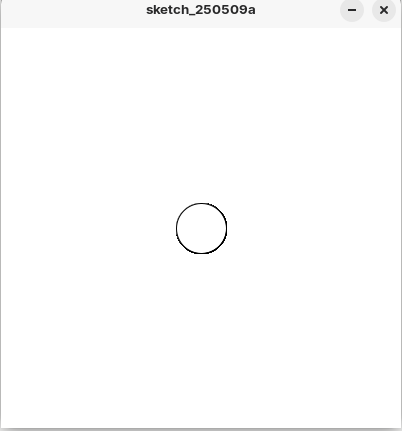
- ポイント:voidは戻り値がない関数、size(width, height)でウィンドウサイズを指定。
2. 基本的な描画関数
Processingは2D/3Dグラフィックを描くための関数が豊富。以下はよく使う2D描画関数。
- rect(x, y, width, height):矩形を描く(x, yは左上の座標)。
- ellipse(x, y, width, height):楕円(円)を描く(x, yは中心)。
- line(x1, y1, x2, y2):直線を描く。
- point(x, y):点を描く。
例:いろいろな図形を描く
processing
void setup() {
  size(400, 400);
  background(255);
}

void draw() {
  rect(50, 50, 100, 80); // 左上(50,50)に幅100、高さ80の矩形
  ellipse(200, 200, 50, 50); // 中心(200,200)に円
  line(0, 0, 400, 400); // 左上から右下に直線
  point(300, 300); // (300,300)に点
}- 結果:
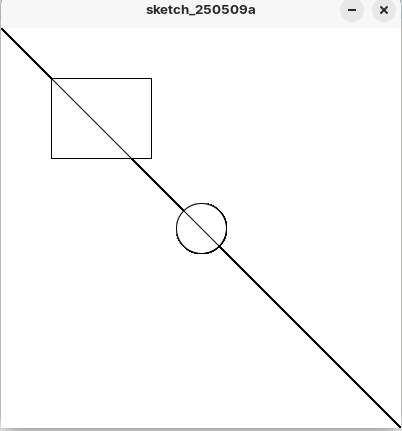
- ポイント:座標系は左上が(0,0)、右下が(width, height)。単位はピクセル。
3. 色とスタイル
描画の色や線のスタイルを制御する関数。
- fill(r, g, b):塗りつぶし色を設定(RGB値、0-255)。
- stroke(r, g, b):線の色を設定。
- noFill():塗りつぶしなし。
- noStroke():線なし。
- strokeWeight(weight):線の太さを設定。
例:カラフルな図形
void setup() {
  size(400, 400);
  background(0); // 背景を黒に
}

void draw() {
  fill(255, 0, 0); // 赤で塗りつぶし
  stroke(0, 255, 0); // 緑の線
  strokeWeight(5); // 線の太さ5ピクセル
  rect(100, 100, 100, 100);

  noFill(); // 塗りつぶしなし
  stroke(0, 0, 255); // 青の線
  ellipse(300, 300, 50, 50);
}- 結果:赤い矩形(緑の太い枠)と、青い枠だけの円が黒背景に描かれる。
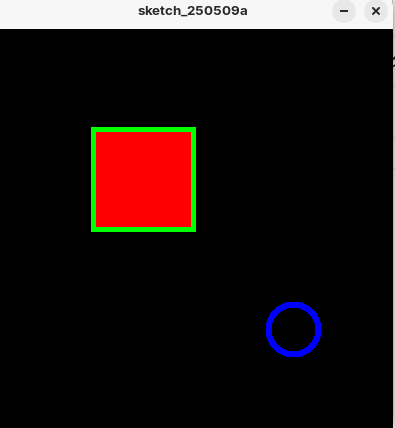
- ポイント:色の設定は次の図形を描くまで有効。background()をdraw()内で呼ぶと画面が毎フレームリセットされる。
4. 変数とデータ型
Processingでは変数を使って動的な描画を制御。主なデータ型:
- int:整数(例:10)。
- float:浮動小数点数(例:3.14)。
- boolean:真偽値(true/false)。
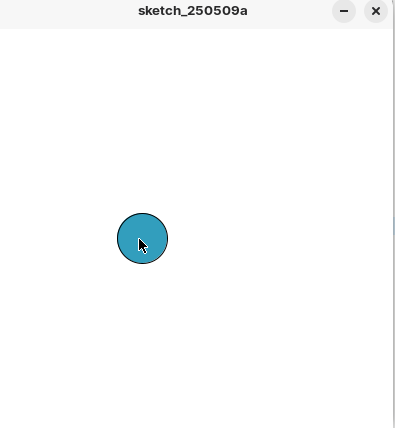
例:マウスの位置で円を動かす
void setup() {
  size(400, 400);
}

void draw() {
  background(255); // 毎フレーム背景を白にリセット
  int x = mouseX; // マウスのX座標
  int y = mouseY; // マウスのY座標
  ellipse(x, y, 50, 50); // マウス位置に円
}- 結果:
録画うまくできなかった…ごめん…
- ポイント:mouseX、mouseYはマウスの現在位置を返す組み込み変数。background()をdraw()内に書くと、前のフレームが消えるのでアニメーションが滑らか。
5. 条件分岐
if文で条件に応じた処理を記述。
例:マウスが右半分にあるとき色を変える
void setup() {
  size(400, 400);
}

void draw() {
  background(255);
  if (mouseX > 200) { // マウスが右半分(x > 200)にある場合
    fill(255, 0, 0); // 赤
  } else {
    fill(0, 0, 255); // 青
  }
  ellipse(mouseX, mouseY, 50, 50);
}- 結果:
- ポイント:if (条件) { 処理 } else { 別の処理 }で分岐。比較演算子(>、<、==など)を使う。
6. ループ
forループで繰り返し処理。グリッドやパターン描画に便利。
例:グリッド状に点を描く
void setup() {
  size(400, 400);
  background(255);
}

void draw() {
  for (int x = 0; x < 400; x += 20) { // xを0から400まで20ずつ増やす
    for (int y = 0; y < 400; y += 20) { // yを0から400まで20ずつ増やす
      point(x, y); // (x,y)に点
    }
  }
}- 結果:
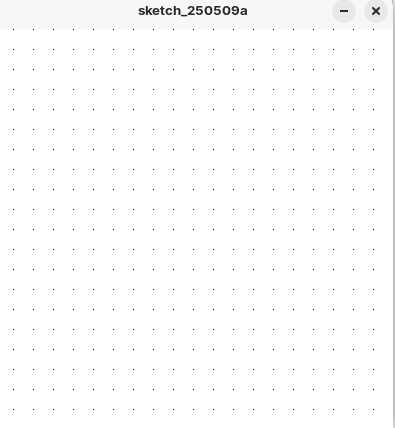
…見える?
- ポイント:for (初期化; 条件; 更新) { 処理 }。ネスト(ループ内ループ)で2次元パターンを作れる。
7. 関数定義
カスタム関数を作ってコードを整理。
例:星形を描く関数
void setup() {
  size(400, 400);
  background(0);
}

void draw() {
  drawStar(200, 200, 50); // 星を(200,200)にサイズ50で描く
}

void drawStar(float x, float y, float size) {
  fill(255, 255, 0); // 黄色
  beginShape(); // 頂点を指定して形状を描く
  for (int i = 0; i < 5; i++) {
    float angle = TWO_PI / 5 * i; // 5つの頂点の角度
    vertex(x + cos(angle) * size, y + sin(angle) * size); // 外側の頂点
    angle += TWO_PI / 10;
    vertex(x + cos(angle) * size * 0.5, y + sin(angle) * size * 0.5); // 内側の頂点
  }
  endShape(CLOSE); // 形状を閉じる
}- 結果:
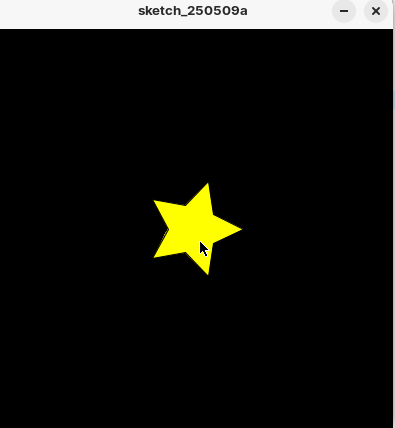
ごめんカーソル写った
- ポイント:void 関数名(引数) { 処理 }で関数定義。beginShape()とvertex()で自由な形状を描ける。TWO_PIは2π(約6.28)。
8. インタラクション
マウスやキーボードの入力を扱う組み込み関数。
- mousePressed:マウスがクリックされたときtrue。
- keyPressed:キーが押されたときtrue。
- key:押されたキーの値。
例:クリックで色を変え、キーでリセット
float r = 255; // 赤成分
float g = 0; // 緑成分
float b = 0; // 青成分

void setup() {
  size(400, 400);
}

void draw() {
  background(255);
  fill(r, g, b);
  ellipse(mouseX, mouseY, 50, 50);
}

void mousePressed() {
  r = random(255); // ランダムな赤
  g = random(255); // ランダムな緑
  b = random(255); // ランダムな青
}

void keyPressed() {
  if (key == 'r') { // 'r'キーでリセット
    r = 255;
    g = 0;
    b = 0;
  }
}- 結果:マウスクリックで円の色がランダムに変わり、’r’キーで赤に戻る。
- ポイント:random(max)で0~maxのランダムな値を生成。mousePressed()やkeyPressed()はイベント駆動で動作。
例
海外にありそうなアートで作ってみました
color bgColor;
color[] palette = {#FFD6E7, #FFB3D1, #FF8EB8, #FF699F, #FF3881, #CB6CE6, #FFF0F7};
float noiseScale = 0.01;
PVector[] particles;
int numParticles = 150;

void setup() {
  size(800, 800);
  bgColor = #FFEBF5;
  particles = new PVector[numParticles];

  // パーティクルの初期位置をランダムに設定
  for (int i = 0; i < numParticles; i++) {
    particles[i] = new PVector(random(width), random(height));
  }

  smooth();
  noStroke();
}

void draw() {
  background(bgColor);

  // キラキラエフェクト
  drawSparkles();

  // 中央に抽象的な人形を描く
  pushMatrix();
  translate(width/2, height/2);

  // 柔らかい背景の円
  fill(palette[6], 150);
  circle(0, 0, 500);

  // 人形の体
  drawDoll();

  // フレームに応じて動くパーティクル
  updateParticles();

  // カワイイ文字
  drawKawaiiText();

  popMatrix();

  // マウスの周りにハートを描く
  drawHeartsAroundMouse();
}

void drawDoll() {
  pushMatrix();

  // 体の部分
  fill(palette[1]);
  ellipse(0, 70, 120, 200);

  // 頭
  fill(palette[0]);
  ellipse(0, -60, 150, 150);

  // 髪
  drawHair();

  // 目
  drawEyes();

  // 口
  fill(palette[3]);
  arc(0, -30, 40, 20, 0, PI, CHORD);

  // 頬
  fill(palette[3], 100);
  ellipse(-40, -20, 30, 20);
  ellipse(40, -20, 30, 20);

  // リボン
  drawRibbon();

  // 手
  fill(palette[0]);
  ellipse(-75, 50, 40, 40);
  ellipse(75, 50, 40, 40);

  // スカート部分
  fill(palette[5], 150);
  arc(0, 110, 180, 140, 0, PI, CHORD);

  // ドット模様
  drawDots();

  popMatrix();
}

void drawHair() {
  fill(palette[5]);

  // 髪の基本形
  arc(0, -60, 170, 170, PI, TWO_PI, CHORD);

  // 左右のツインテール
  pushMatrix();
  translate(-65, -50);
  rotate(sin(frameCount * 0.03) * 0.2);
  beginShape();
  vertex(0, 0);
  bezierVertex(-30, 40, -60, 100, -40, 150);
  bezierVertex(-35, 170, -15, 160, -10, 140);
  bezierVertex(0, 100, 10, 50, 0, 0);
  endShape(CLOSE);
  popMatrix();

  pushMatrix();
  translate(65, -50);
  rotate(-sin(frameCount * 0.03) * 0.2);
  beginShape();
  vertex(0, 0);
  bezierVertex(30, 40, 60, 100, 40, 150);
  bezierVertex(35, 170, 15, 160, 10, 140);
  bezierVertex(0, 100, -10, 50, 0, 0);
  endShape(CLOSE);
  popMatrix();

  // 前髪
  fill(palette[5]);
  arc(0, -110, 130, 60, 0, PI, CHORD);

  // 髪の装飾
  drawHairAccessories();
}

void drawHairAccessories() {
  // 左側の星
  pushMatrix();
  translate(-50, -90);
  rotate(frameCount * 0.01);
  fill(#FFEB3B);
  star(0, 0, 10, 20, 5);
  popMatrix();

  // 右側の星
  pushMatrix();
  translate(50, -90);
  rotate(-frameCount * 0.01);
  fill(#FFEB3B);
  star(0, 0, 10, 20, 5);
  popMatrix();
}

void drawEyes() {
  // 白目
  fill(255);
  ellipse(-25, -50, 35, 40);
  ellipse(25, -50, 35, 40);

  // 黒目
  float eyeX = map(mouseX, 0, width, -3, 3);
  float eyeY = map(mouseY, 0, height, -2, 2);

  fill(#5D4037);
  ellipse(-25 + eyeX, -50 + eyeY, 20, 25);
  ellipse(25 + eyeX, -50 + eyeY, 20, 25);

  // ハイライト
  fill(255);
  ellipse(-30 + eyeX, -55 + eyeY, 8, 8);
  ellipse(20 + eyeX, -55 + eyeY, 8, 8);

  // まつげ
  stroke(#5D4037);
  strokeWeight(2);

  // 左目のまつげ
  line(-40, -70, -35, -60);
  line(-25, -75, -25, -65);
  line(-10, -70, -15, -60);

  // 右目のまつげ
  line(40, -70, 35, -60);
  line(25, -75, 25, -65);
  line(10, -70, 15, -60);

  noStroke();
}

void drawRibbon() {
  fill(palette[3]);

  // リボンの中心
  ellipse(0, -110, 20, 20);

  // リボンの左側
  pushMatrix();
  translate(-10, -110);
  rotate(-PI/4);
  ellipse(0, 0, 30, 15);
  popMatrix();

  // リボンの右側
  pushMatrix();
  translate(10, -110);
  rotate(PI/4);
  ellipse(0, 0, 30, 15);
  popMatrix();

  endShape();
}

void drawDots() {
  fill(palette[6]);
  for (int i = 0; i < 12; i++) {
    float angle = i * TWO_PI / 12;
    float x = 60 * cos(angle);
    float y = 60 * sin(angle) + 70;
    circle(x, y, 10);
  }
}

void drawSparkles() {
  // キラキラエフェクト
  for (int i = 0; i < 30; i++) {
    float x = random(width);
    float y = random(height);
    float size = random(1, 4);

    fill(255, random(100, 200));
    star(x, y, size, size*2, 4);
  }
}

void updateParticles() {
  fill(palette[2], 150);

  for (int i = 0; i < numParticles; i++) {
    // パーティクルを描画
    float size = noise(particles[i].x * 0.01, particles[i].y * 0.01, frameCount * 0.01) * 15 + 3;
    circle(particles[i].x - width/2, particles[i].y - height/2, size);

    // パーティクルを動かす
    float angle = noise(particles[i].x * noiseScale, particles[i].y * noiseScale, frameCount * 0.01) * TWO_PI * 2;
    particles[i].x += cos(angle) * 1;
    particles[i].y += sin(angle) * 1;

    // 画面外に出たら反対側から再登場
    if (particles[i].x < 0) particles[i].x = width;
    if (particles[i].x > width) particles[i].x = 0;
    if (particles[i].y < 0) particles[i].y = height;
    if (particles[i].y > height) particles[i].y = 0;
  }
}

void drawKawaiiText() {
  fill(palette[5]);
  textAlign(CENTER, CENTER);
  textSize(30);

  // 少し揺れるテキスト
  float offsetX = sin(frameCount * 0.05) * 5;
  float offsetY = cos(frameCount * 0.05) * 5;

  text("I love u", offsetX, offsetY + 200);
}

void drawHeartsAroundMouse() {
  // マウスの周りにハートを描く
  if (mousePressed) {
    for (int i = 0; i < 5; i++) {
      float heartX = mouseX + random(-50, 50);
      float heartY = mouseY + random(-50, 50);
      float heartSize = random(10, 30);

      pushMatrix();
      translate(heartX, heartY);
      rotate(random(TWO_PI));
      scale(heartSize / 30);

      fill(palette[int(random(palette.length))], 200);
      drawHeart(0, 0);

      popMatrix();
    }
  }
}

void drawHeart(float x, float y) {
  beginShape();
  vertex(x, y);
  bezierVertex(x, y-3, x-5, y-15, x-20, y-15);
  bezierVertex(x-40, y-15, x-40, y+15, x-20, y+25);
  bezierVertex(x-15, y+30, x-5, y+35, x, y+40);
  bezierVertex(x+5, y+35, x+15, y+30, x+20, y+25);
  bezierVertex(x+40, y+15, x+40, y-15, x+20, y-15);
  bezierVertex(x+5, y-15, x, y-3, x, y);
  endShape();
}

void star(float x, float y, float radius1, float radius2, int npoints) {
  float angle = TWO_PI / npoints;
  float halfAngle = angle/2.0;
  beginShape();
  for (float a = 0; a < TWO_PI; a += angle) {
    float sx = x + cos(a) * radius2;
    float sy = y + sin(a) * radius2;
    vertex(sx, sy);
    sx = x + cos(a+halfAngle) * radius1;
    sy = y + sin(a+halfAngle) * radius1;
    vertex(sx, sy);
  }
  endShape(CLOSE);
}

void mouseClicked() {
  // クリックで色を変える
  bgColor = palette[int(random(palette.length))];
}
とある高専生。
AIとネットが好き。
将来はAIの妹と火星に住みたい。
discord : r_nightcore
このサイトの管理者。
コメント